Are you tired of static-filled music and distorted sound coming from your car’s cassette player? Well, fear not! In this article, we’ll show you how to clean your cassette player in your car to give you crystal clear tunes that will make your drive a lot more enjoyable. Cleaning your cassette player may seem like a daunting task, but with a few simple steps, you’ll have it sounding as good as new in no time. So, let’s dive in and learn how to bring life back to your beloved cassette player.
When it comes to cleaning your cassette player in your car, it’s important to follow a few key steps to ensure the best results. First and foremost, you’ll want to gather the necessary tools: a cotton swab, rubbing alcohol, and a cassette tape head cleaning solution. These items will help remove any dirt, debris, or built-up residue that may be affecting the performance of your cassette player. With these in hand, you’re ready to embark on your cleaning journey and restore your car’s cassette player to its former glory. So, let’s get started and get your music sounding amazing again!
- Start by disconnecting the cassette player from the power source.
- Remove the cassette player from the dashboard or console, if possible.
- Use a can of compressed air to gently blow away dust and debris from the player.
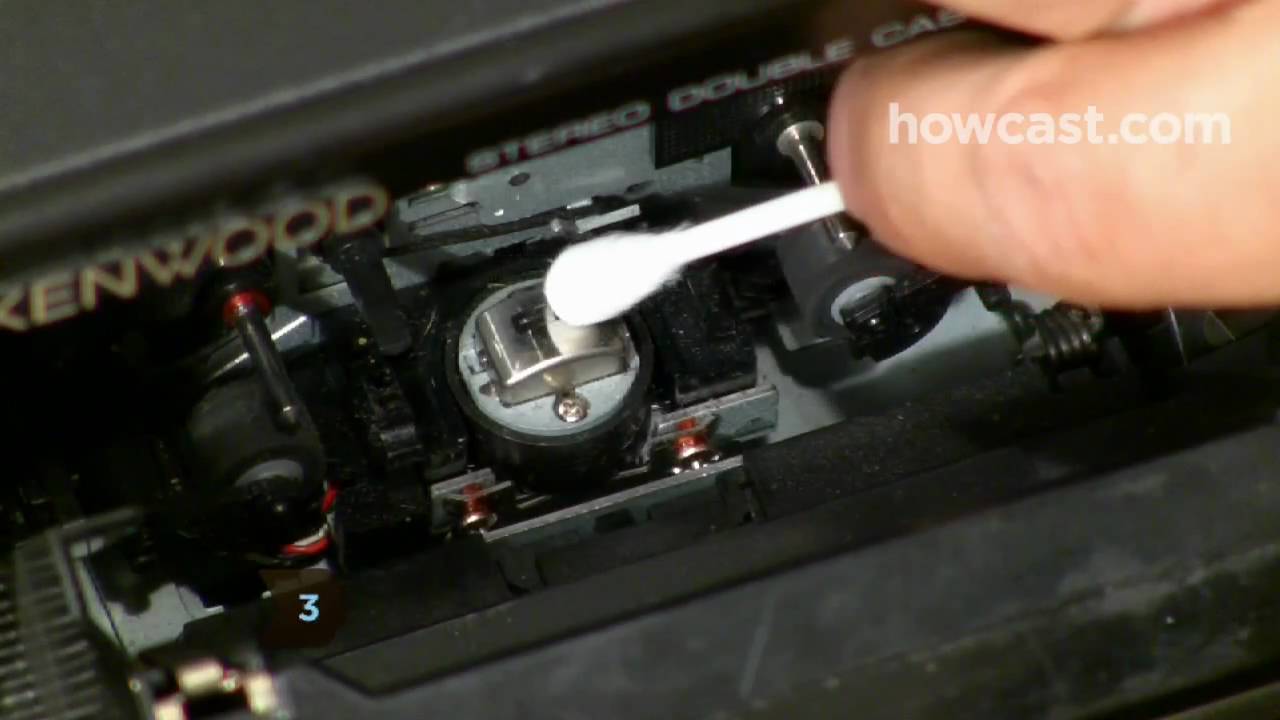
- Moisten a cotton swab with rubbing alcohol and carefully clean the playback head, pinch roller, and capstan.
- Allow the components to dry completely before reconnecting the cassette player.
- Reinstall the cassette player and test it with a cassette tape to ensure proper functioning.
Contents
How to Clean Your Cassette Player in Your Car: A Step-by-Step Guide
The cassette player in your car is a classic piece of technology that can bring back nostalgia and a sense of simplicity. However, over time, dust, dirt, and debris can accumulate and affect the performance of your cassette player. To ensure optimal sound quality and prolong the lifespan of your cassette player, regular cleaning is necessary. In this article, we will provide you with a step-by-step guide on how to clean your cassette player in your car effectively.
Why is Cleaning Your Cassette Player Important?
Keeping your cassette player clean is crucial for maintaining its functionality and sound quality. Over time, dust, dirt, and debris can accumulate on the cassette player’s heads, pinch rollers, and capstan. This buildup can lead to poor sound quality, distorted playback, and even damage to your cassette tapes. Regular cleaning can help prevent these issues and ensure that your cassette player performs at its best.
When cleaning your cassette player, it’s essential to be gentle and cautious. The delicate components of the player can easily be damaged if not handled properly. With the right tools and techniques, you can effectively clean your cassette player and enjoy your favorite tunes without any issues.
Tools Needed for Cleaning Your Cassette Player
Before diving into the cleaning process, make sure you have the following tools ready:
1. Cotton swabs or cotton buds
2. Isopropyl alcohol (90% or higher concentration)
3. Compressed air can or an air blower
4. Soft lint-free cloth
5. Cleaning cassette (optional)
Step 1: Prepare Your Cassette Player
Start by turning off your car’s engine and removing the cassette tape from the player. This will prevent any accidental damage to the tape and ensure your safety during the cleaning process. It’s also a good idea to disconnect any external audio devices, such as auxiliary cables or Bluetooth adapters, from the cassette player.
Step 2: Cleaning the Heads
The heads of your cassette player are responsible for reading the audio signals from the tape. Over time, they can accumulate dirt and debris, leading to poor sound quality. To clean the heads, dip a cotton swab or cotton bud into isopropyl alcohol and gently rub it against the heads. Be sure to rotate the swab to clean all sides of the heads thoroughly. Avoid using excessive force to prevent any damage to the delicate components.
Step 3: Cleaning the Pinch Rollers and Capstan
The pinch rollers and capstan work together to move the cassette tape smoothly during playback. Like the heads, they can gather dirt and debris, affecting the tape’s movement and sound quality. To clean the pinch rollers and capstan, moisten a cotton swab or cotton bud with isopropyl alcohol and gently rub it against the surfaces. Again, be gentle and avoid applying too much pressure.
Step 4: Removing Dust and Debris
To remove any loose dust and debris from the cassette player, you can use a can of compressed air or an air blower. Hold the nozzle a few inches away from the player and use short bursts of air to blow away the dust. Pay attention to the crevices and hard-to-reach areas of the player. Alternatively, you can use a soft lint-free cloth to wipe away any visible dust or debris.
Step 5: Optional – Using a Cleaning Cassette
If you want a more thorough cleaning, you can use a cleaning cassette specifically designed for cassette players. These cleaning cassettes have special cleaning pads that can effectively remove dirt and debris from the heads, pinch rollers, and capstan. Simply insert the cleaning cassette into your player and follow the manufacturer’s instructions.
Step 6: Final Touches
After cleaning your cassette player, give it some time to dry before inserting a cassette tape. This will ensure that any residual moisture from the cleaning process evaporates completely. Once the player is dry, you can reconnect any external audio devices and enjoy your favorite music with improved sound quality.
Maintaining a Clean Cassette Player
Cleaning your cassette player should be part of your regular maintenance routine. Here are a few tips to help you keep your cassette player clean and functioning optimally:
– Avoid exposing your cassette player to excessive heat or moisture, as these can damage the internal components.
– Store your cassette tapes in a cool, dry place to prevent them from accumulating dust and debris.
– Regularly clean the heads, pinch rollers, and capstan to prevent dirt buildup.
– If you notice any issues with your cassette player, such as playback problems or distorted sound, clean it immediately before the problem worsens.
By following these simple maintenance tips and regularly cleaning your cassette player, you can ensure that it continues to provide you with hours of enjoyable music playback in your car.
In conclusion, cleaning your cassette player in your car is essential for maintaining optimal sound quality and prolonging its lifespan. By following the step-by-step guide provided in this article, you can effectively clean your cassette player and enjoy your favorite music without any issues. Remember to be gentle and cautious during the cleaning process to avoid damaging the delicate components of the player. With regular maintenance and cleaning, your cassette player will continue to bring back nostalgic tunes and memories for years to come.
Key Takeaways: How to Clean a Cassette Player in Your Car
- Start by gently ejecting the cassette from the player.
- Use a cotton swab dipped in rubbing alcohol to clean the playback heads.
- Gently clean the cassette player’s capstan and pinch roller with a soft cloth.
- Remove any debris from the cassette player’s mechanism using compressed air.
- Regularly clean the cassette player to ensure optimal performance and longevity.
Frequently Asked Questions
How often should I clean my cassette player in my car?
Regular cleaning of your cassette player is essential to maintain its performance. It is recommended to clean the player at least once every three months, or more frequently if you notice any issues with playback quality or tape jamming.
To prevent dirt and debris from accumulating, it’s a good practice to clean the player after long road trips or when you notice a significant amount of dust in your car.
What tools do I need to clean my cassette player?
To clean your cassette player, you will need a few basic tools:
1. Soft cloth or microfiber cloth: Use this to gently wipe the exterior of the player and remove any dust or fingerprints.
2. Cotton swabs or cotton buds: These are useful for reaching small crevices and cleaning the playback head, capstan, and pinch roller.
3. Isopropyl alcohol: This is a cleaning agent that can help remove stubborn dirt or residue from the player’s components.
How do I clean the cassette player’s playback head?
1. Disconnect the cassette player from the power source and remove any cassette tape from the player.
2. Dampen a cotton swab or cotton bud with isopropyl alcohol. Gently rub the swab against the playback head, moving it back and forth to remove any dirt or debris.
3. Use a dry cotton swab to remove any excess alcohol and ensure the playback head is dry before reconnecting the player.
Remember to be gentle while cleaning the playback head to avoid causing any damage to the delicate components.
How can I clean the capstan and pinch roller of my cassette player?
1. Turn off the cassette player and disconnect it from the power source.
2. Moisten a cotton swab or cotton bud with isopropyl alcohol. Gently clean the capstan, which is the metal spindle located near the playback head.
3. Clean the pinch roller, which is the rubber roller that presses the tape against the capstan, using the same method with a fresh cotton swab.
4. Wipe away any excess alcohol with a dry cotton swab and ensure both the capstan and pinch roller are dry before reassembling the player.
Can I use a cassette cleaner tape to clean my cassette player?
Using a cassette cleaner tape can be a convenient option for cleaning your cassette player. However, it’s important to follow the instructions provided with the cleaner tape and use it correctly.
Some cleaner tapes have built-in cleaning agents that can effectively remove dirt and debris from the player’s components. Follow the instructions on the cleaner tape packaging to ensure proper usage and avoid damaging the player.
It’s worth noting that regular manual cleaning, as described in the previous questions, is also recommended to thoroughly maintain your cassette player’s performance.
Final Thoughts
So there you have it, folks! Cleaning your cassette player in the car doesn’t have to be a daunting task. With a few simple steps and some household items, you can keep your cassette player in top shape and ensure a smooth musical journey on the road. Remember, a clean cassette player means better sound quality and a longer lifespan for your tapes.
In conclusion, regular maintenance is key to preserving the functionality of your cassette player. By gently cleaning the exterior, removing dust and debris from the tape compartment, and using a cassette head cleaner, you can enjoy uninterrupted music playback during your road trips. Additionally, don’t forget to store your tapes properly to prevent damage and prolong their lifespan. So go ahead, put on your favorite mixtape, and hit the open road with a clean and well-maintained cassette player in your car!
Remember, keeping your cassette player clean not only improves its performance but also enhances your overall listening experience. So take a few minutes to give it some TLC and enjoy your favorite tunes with crystal-clear sound. Happy cleaning and happy cruising!
